Power Content’s Search Engine
Power Content has a built-in search engine that allows you to set up search bars across your website, and it lets your users search for published content. This search engine has many powerful features that I’ll explain in detail in this article.
Topics that will be covered in this article:
- Setting up the search engine
- Using the search module to display the search input
- Setting up the search results page
- Extra: Overriding the search results HTML (making your own custom search results layout)
- Extra: Overriding the search module HTML
- Extra: Developers (search objects, available properties, and methods)
Setting up the search engine
Setting up the search engine is extremely easy. You have three simple steps to go over and you’re done.
Navigate to Power Content’s configuration view and click the “EPC Search Engine” tab. Here, we will set up our search configuration. The options are as follows:
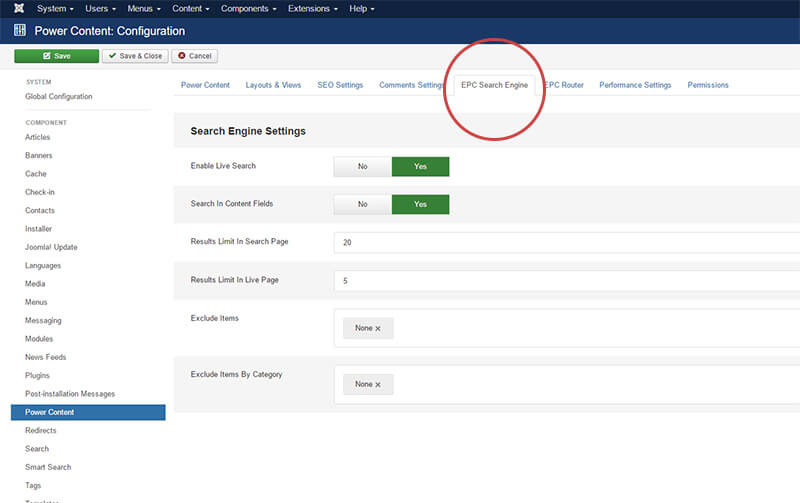
Here, we will set up our search configuration. The options are as follows:
Enable Live Search – Turning this on will enable the AJAX (live) search that will display results right below the search bar (input). Users will be able to submit the search regularly and also, if the live results gave them what they are looking for, to navigate right to the page they wish to see.
Search in Content Fields – Turned OFF, the search engine will look for matches ONLY by the item names. For example, if we have an item named “My Portfolio” and users search “portfolio” (or port, portf, por, etc.), they will get this page in results. Turned ON, users will also get results if the search matches the text in any of the content fields you have on this page; for example, full text, intro text, or other content fields.
Results Limit in Search Page – The maximum matching results that the users will see on the search results page. A user may have searched for a word that appears 1,000 items, but he will only get the MOST relevant top X (or whatever you choose in this option).
Results Limit in Live Page – Works exactly as the option above, with the only difference being that this limits the results for the AJAX live search.
Exclude Items – You can (and even should) exclude irrelevant items from your search engine, such as your homepage.
Exclude Items by Category – You can also exclude entire categories from your search. For example, if you have a hidden category for registered users or you simply don’t want your blog articles to be found in the search, this is where you exclude it.
Using the search module to display the search input
When you installed Power Content, you also installed several built-in modules. One of them is the “Power Content Search” module, which allows you to place as many search bars as you like across your website. So, navigate to your modules manager and create a new search module. This module is a completely standard Joomla module; just publish it, assign it to your pages, and select the position. Now it’s time to set up the module’s configuration:
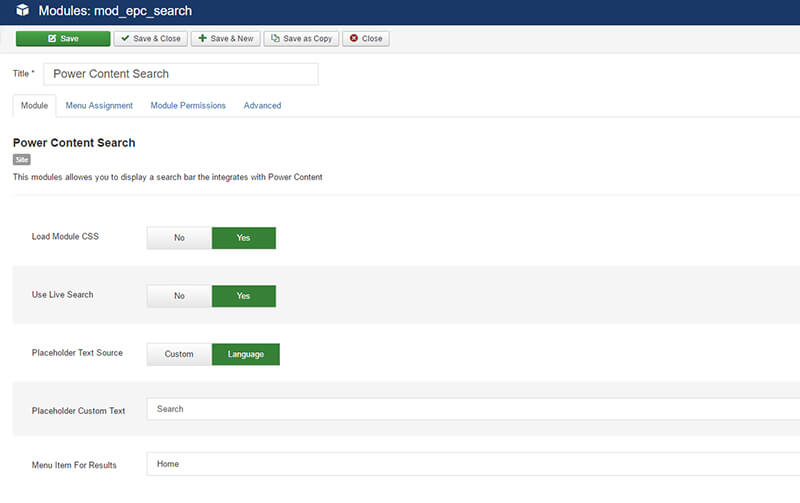
Load CSS – This will load the search module’s default CSS, which will bring a little structure to the search bar.
Use Live Search – You might have noticed that this option also appears in the configuration of the search engine in Power Content’s configuration. The reason for that is that you can choose to enable or disable the live search globally, from the CCK’s configuration, but then override this option for particular search bars. This allows you to have more control.
Placeholder Text Source – You can choose if the text inside the placeholder of the search input will be taken from the language file or, you can choose “Custom” and simply insert your own text in the field below.
Placeholder Custom Text – If you choose “Custom” in the above field, the text you will insert here will be the text appearing in the placeholder.
Menu Item for Results – Choose a menu item for search results. NOTE: When creating new menu items, you will have the option to create a menu item with “Search Results” under Power Content in the menu item type. You will want to use this in order to prevent duplicated search pages. (The next section will explain this in detail.)
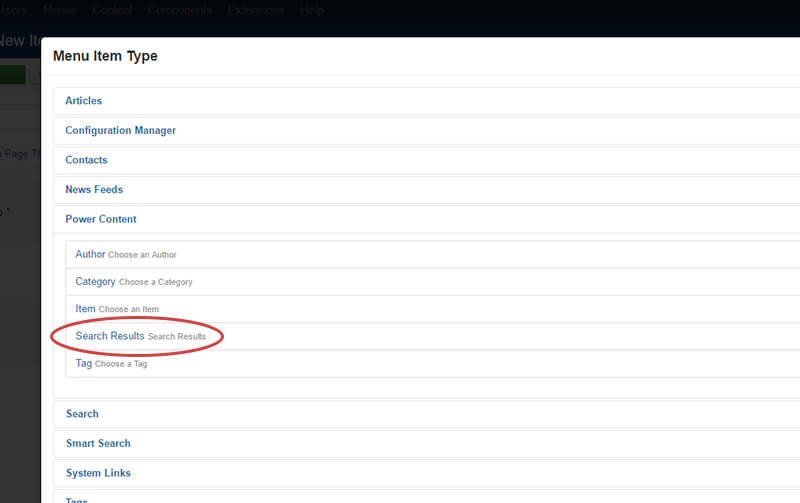
Setting up the search results page
Go to your website’s menus and create a new menu item. Click the “Menu Item Type” and then “Power Content”. You will see an option to set up a search results page. After clicking on it, and saving it, you will have your results page. Now, this is not mandatory—the search engine will work without a specific search results page; the only thing is that it will have a dynamic URL depending on the page the user searched from. This is not recommended. You should want your search results to have its own URL just like any other page of the website. So, go ahead and create this menu item. (Don’t forget to link to it from the search module as explained in the previous section.)
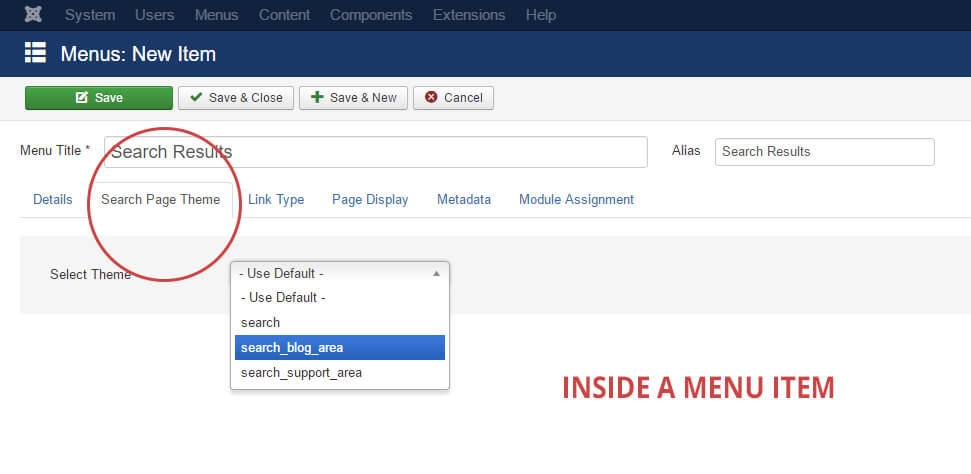
Note: You might have noticed that after selecting the menu item, a new tab called “Search Page Theme” appears. This tab allows you to customize themes for the search results page and will be explained in detail in the next section.
Extra: Overriding the search results HTML (making your own custom search results layout)
Creating your own search results layout is very easy. Power Content Themes Engine enables you to create as many layouts as you want and display them with as many search modules as you want.
Let’s dive into it:
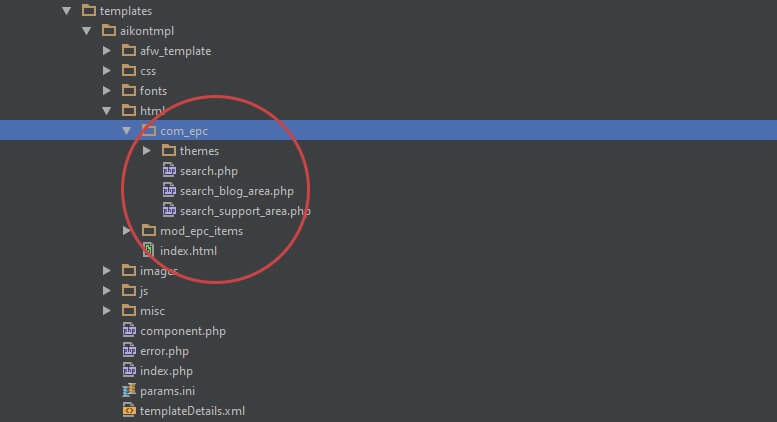
In order to “Override” the default search layout, simply create a folder “com_epc” inside your template’s “HTML” folder and copy the below file into it: components/com_epc/views/search/tmpl/default.php
You should now have the following structure:
root/templates/yourtemplate/html/com_epc/default.php
Now, rename this file to “search.php” and that’s it! You’re done! You can now open this file, and change whatever you want!
In order to create multiple different search results pages, all you need to do is duplicate the same file and rename it like this: “search_something.php”. You can make as many files like this as you wish. In order to assign this layout to a search results page, navigate to your search results menu item, click on the tab “Search Page Theme” and select the layout you have just created. In the images below, you will be able to see how it’s done. Ignore the folder “themes” in the image, it is related to other parts of the themes engine and is explained in detail in the “Themes Engine” part of the documentation.
NOTE: Any file placed under the “com_epc” folder inside your “html” folder in your template, that is named search_something.php, will be available for selection the exact same way.
Extra: Overriding the search module HTML
Just like any other modules in Joomla, Power Content modules can also be overridden by making an “Alternative Layout”. This is a basic Joomla feature so I hope that you are already familiar with this. If you are not, don’t worry, I’m going to explain this in a second. You can (and should) also check out Joomla’s documentation regarding this awesome feature here: https://docs.joomla.org/How_to_override_the_output_from_the_Joomla!_core
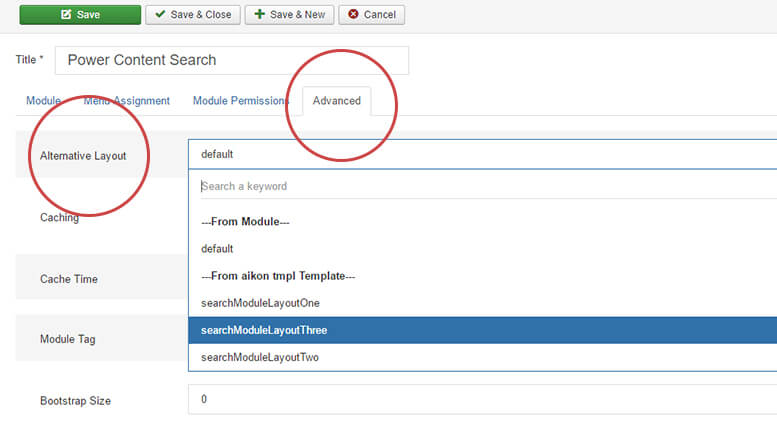
In order to override a modules layout, we will go to the “Advanced” tab inside the module. The first option you will see there is “Alternative Layout”. What this does is basically search for files other than “default.php” in the module tmpl folder and in your template. In order to create our own custom layout, copy the “default.php” file from the module. You can find it here:
modules/mod_epc_search/tmpl/default.php
and place it in the following structure: root/templates/yourtemplate/html/mod_epc_search/default.php
The file name “default.php” will be the layout loaded for the module if you keep the name. You can also rename it and even make several different layouts under the same folder. Note that it will work only if you named your files in the following format: myCustomFileName.php OR mycustomfilename.php. Underscores “_” will not work, but hyphens may work - I didn’t check. (Don’t ask me my, ask Joomla. :) ) Then go back to the “Alternative Layout” option in the module and simply select the layout you have just created.
Important: Basically, you can change whatever you want, the HTML elements and their classes, the CSS and everything else. However, keep a few things in mind:
- There are several “data-attributes” to the elements, such as the form tag, the search input, and the live results UL container. If you remove those data-attributes, live search will stop working.
- This is mainly for developers: The JavaScript that is responsible for the live search is right there in the layout. The reason for that is that I wanted you to be able (if you want) to override some of it. The reason you may want to do this is if you want a different behavior (animations and stuff) or to display additional data in the live search. I’ll explain the possibilities in the next section.
Extra: Developers (Search objects, available properties, and methods)
Hi, experts! There are couple of things you may like to know:
- In the JS at the end of the layout file, you will find a method named updateSearchUi(). This method (how surprising) is responsible for updating the UI with the results from the AJAX search. It gets an object named results, which I loop through and build the result HTML. In the basic display of the search, I put the name of the result page (result.name) and the link to the page (result.link). If you log this object to your console, you will see that there are also result.author and result.category available for you to display.
- In the search results layout, you will find the object: $this->search. Inside, there will be an array named “results” ($this->search->results) containing the matching search results. In addition to that array, you will also find two properties: $this->search->count, which is an integer holding the number of matching results; and $this->search->question, which is a string holding the question the user entered into the search input.
- In the results array, you will find objects containing the entire data of the record found, including the content fields, category, authors, tags, and everything else. Just dump the data. You can and should use the Power Debugger plugin that comes built in with Power Content and lets you visually and easily search your dumped data.