Content Fields
Power Content’s “Content Fields” (usually referred to as “Custom Fields” or “Extra Fields”) is THE strongest feature of Power Content and one of the top reasons Power Content is actually the most powerful and easy-to-use CCK, for any type of user, developers, web masters, SEO people, and our clients. Using the incredible Content Fields engine lets you develop almost anything, with any layout and whatever data you want.
If you know how to code, even a little bit, you can even kiss goodbye the numerous extensions you usually install on you websites, with a smart usage of the content fields, and with the repeatable feature, you can create full galleries, sliders, sections, head codes, and much, much more. By the way—you can assign your fields to whatever record type you want. On items, authors, tags, and categories, with very smart filtering and assignment options, using and maintaining your field is extremely easy, for us and for our clients!
So, let’s dive in and understand what those Content Fields are and how we work with them.
Topics that will be covered in this article:
- What are Content Fields and how does it work?
- Creating and using Content Fields
- Accessing Content Fields in the code
- Types of available Content Fields
What are Content Fields and how does it work?
Content Fields are a way to set up different kind of fields to the admin’s forms. Any admin form: items, categories, authors, and tags. Using those fields, we can make complex layouts and sections for our websites, while letting our clients manage everything easily and from a single place, which is the record itself. They don’t need to understand anything about it, and they don’t need to know how to set fields up. They simply need to manage it from the appropriate record; for example, we may have a page called “Services” and we have set up four different sections there. Using the Content Fields, our clients will manage all sections of the services page from the services item in the admin. We can also set them up with repeatable fields and then they can also create endless new sections that keep the formatting and design of the website out-of-the-box.
In most CCK extensions, Content Fields are called “Extra Fields.” The reason I have called it “Content Fields” is that it is not an extra of anything! There are no built-in fields like usual. There aren’t an editor field, several links fields, and an image field built in, and we can just add more fields as “Extra Fields.” Power Content has zero built-in fields. All fields are completely custom. This allows the management of the records to be extremely powerful and extremely clean. Why should we display a “text” field, four links fields, and an image field, if we’re not using them, or, using just some of them? And maybe they’re even for a different purpose. I mean, not every page has a “main content section.” A page named “Services,” for example, may have five different text sections for each service, instead of one “main” text area.
Creating and using Content Fields
Creating content fields is easy; each content field must be assigned to a content fields group. We are basically setting up a content fields group, and then populating it with as many fields as we like. When we have a group populated with the fields we want, we simply assign this group to the records we wish to use it for.
Steps for using content fields:
- Creating a Fields Group
- Populating the group with fields
- Assigning the group to our records
- Filling the fields with content from the record pages
- Displaying the fields on our web pages and code access
Let me take you through the step-by-step process from creating a Fields Group to displaying the fields on our web pages.
Creating a Fields Group
Navigate to “Content Fields Groups” from Power Content’s top or side menus:
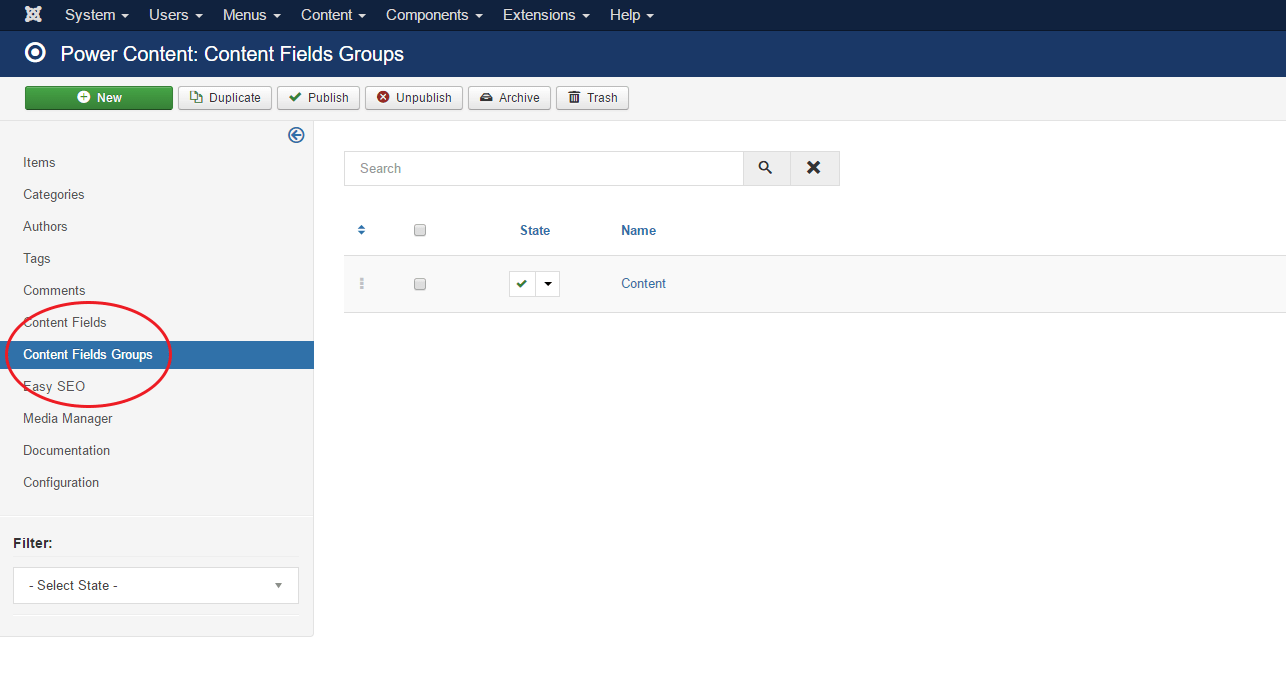
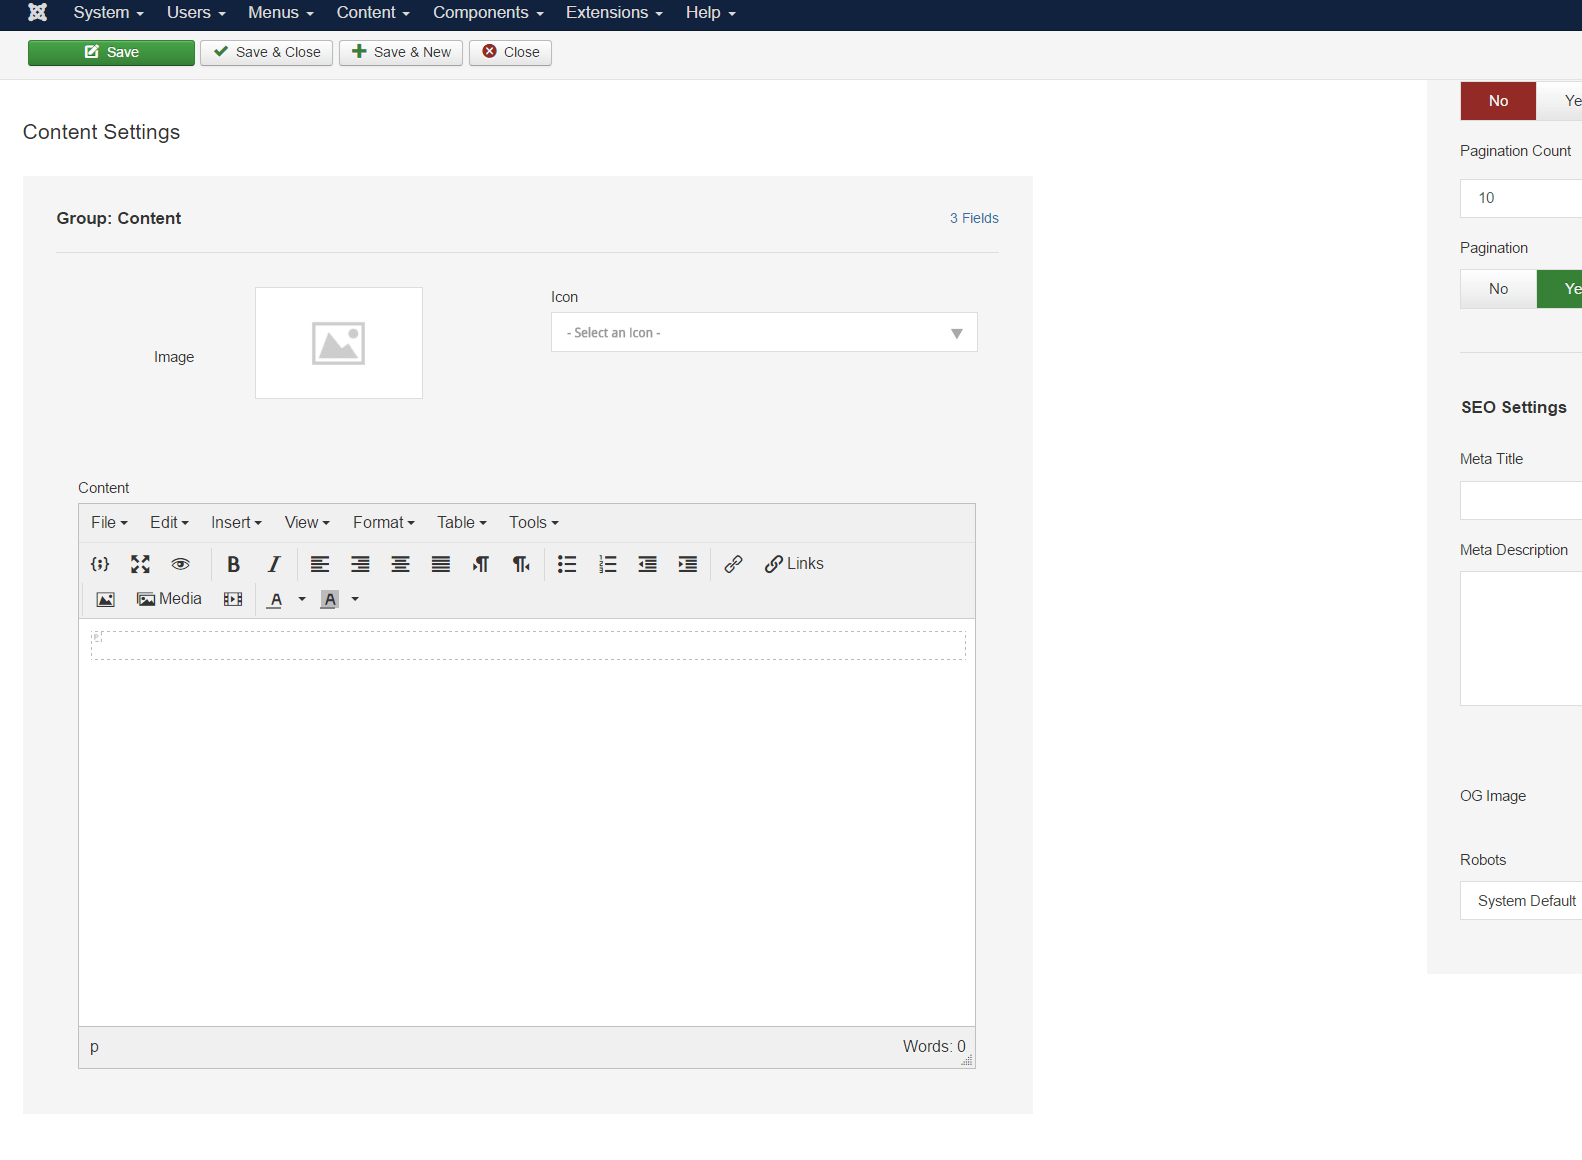
As a default, you will have a group named “Content” with two different fields assigned to it. You can ignore it for the time being as we are now creating this from scratch, step-by-step.
Let’s click the green “New” button on the top and you will be taken to the creation of a new group page:
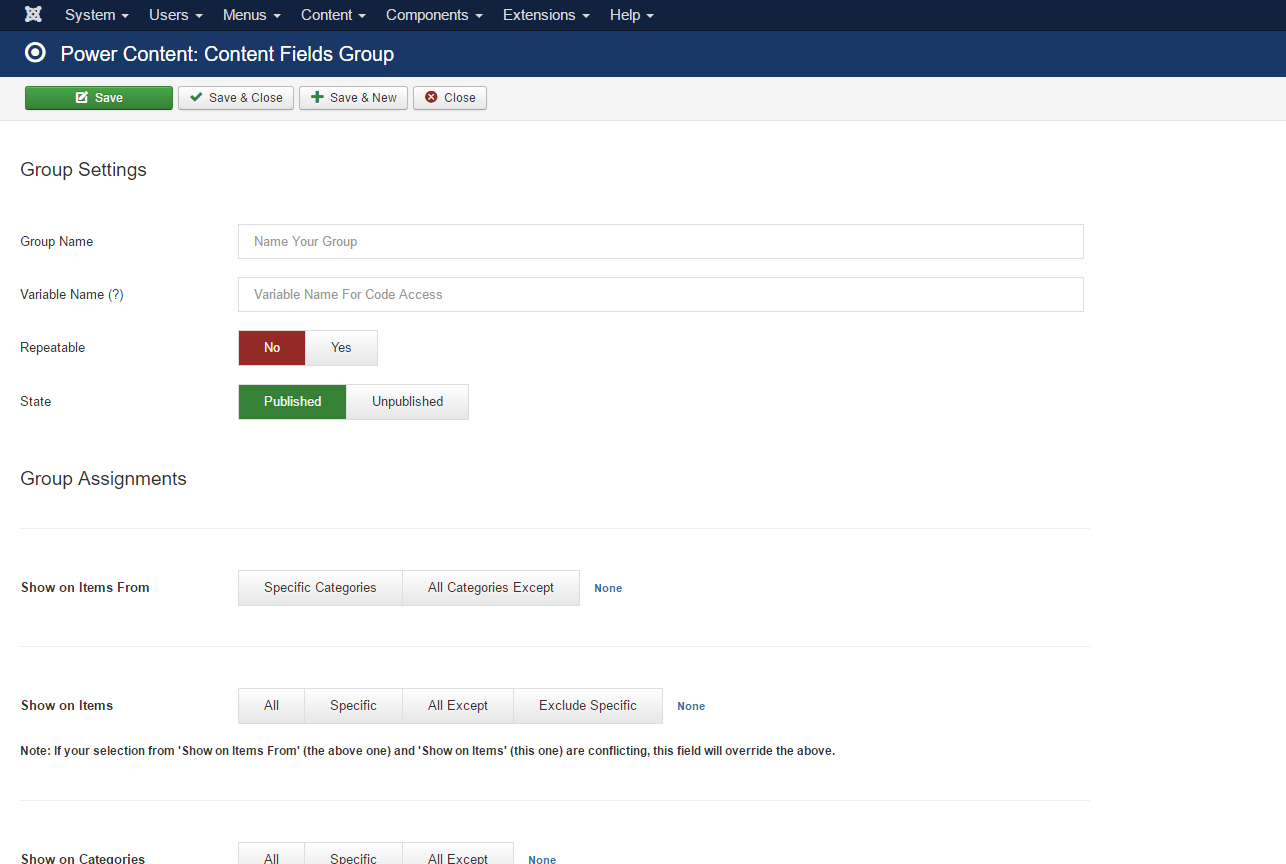
As you can see in the image, there are many different options you can set up for your group. Divided into two sections, Group Settings and Group Assignments, Group Settings is used to set up general functionality for our group while Group Assignments is used to assign our group to different records. For now, we will concentrate on the first section: “Group Settings”. Later in this documentation, we will get back to “Group Assignments”.
Let’s understand those settings:
Group Name - This is the name of the group that will appear in the record. It doesn’t have much functionality and is used mostly for identification, so give it a clear name.
In our example, let’s call it “Sample Fields Group”.
Variable Name – This is important; what you put here will define the way we access the group from the code. You can put anything you want here, just notice that Power Content will strip the text you put here and format any spaces or special characters to an underscore, as well as lowercase.
In our example, let’s insert: “sample_fields_group”.
Repeatable – If this is set to “Yes”. you will be able to create unlimited copies with different contents from the record itself. This option is extremely powerful and allows you to have huge flexibility over your website.
In our example, let’s set it to: “Yes”.
State – Published/Unpublished. If it’s unpublished, you won’t see it or be able to access it anywhere.
OK, now that we have our Fields Group, let’s hit Save & Close and start populating it with fields.
Populating the group with fields
In this section, we will learn how to create the fields themselves and assign them to our groups. We will continue the step-by-step instructions and will populate the example group we have created in the previous section: “Sample Fields Group”.
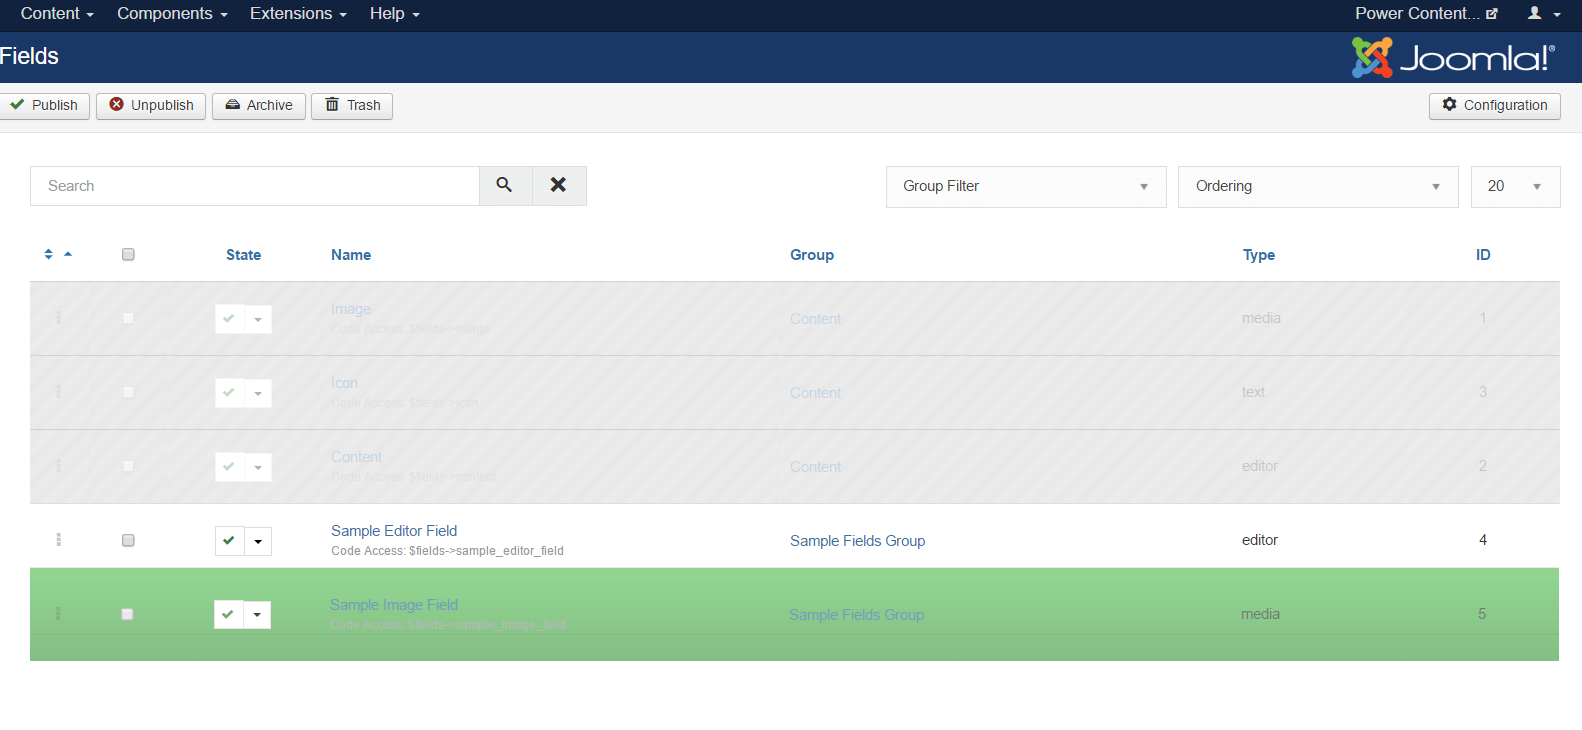
Let’s navigate to “Content Fields” view by clicking the “Content Fields” link from Power Content’s top and side menus.
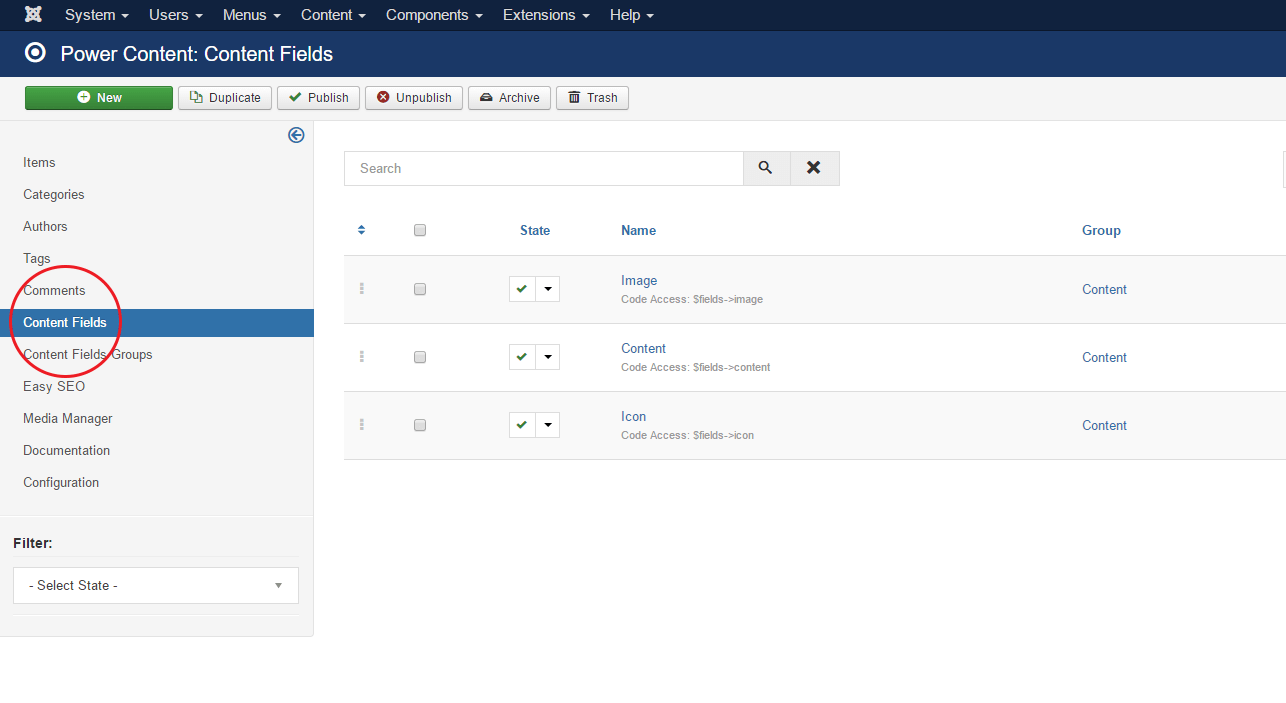
If you have just installed Power Content, you will see two default fields named “Content” and “Image”. You can just ignore those for now as we are creating new ones. Also ignore the “Icon” field that you see in the picture; it is simply a screenshot from this documentation site and this field is used to set up the icon you see for each documentation item in the right menu.
Let’s go ahead and create a new field. Click the green “New” button at the top of the page.
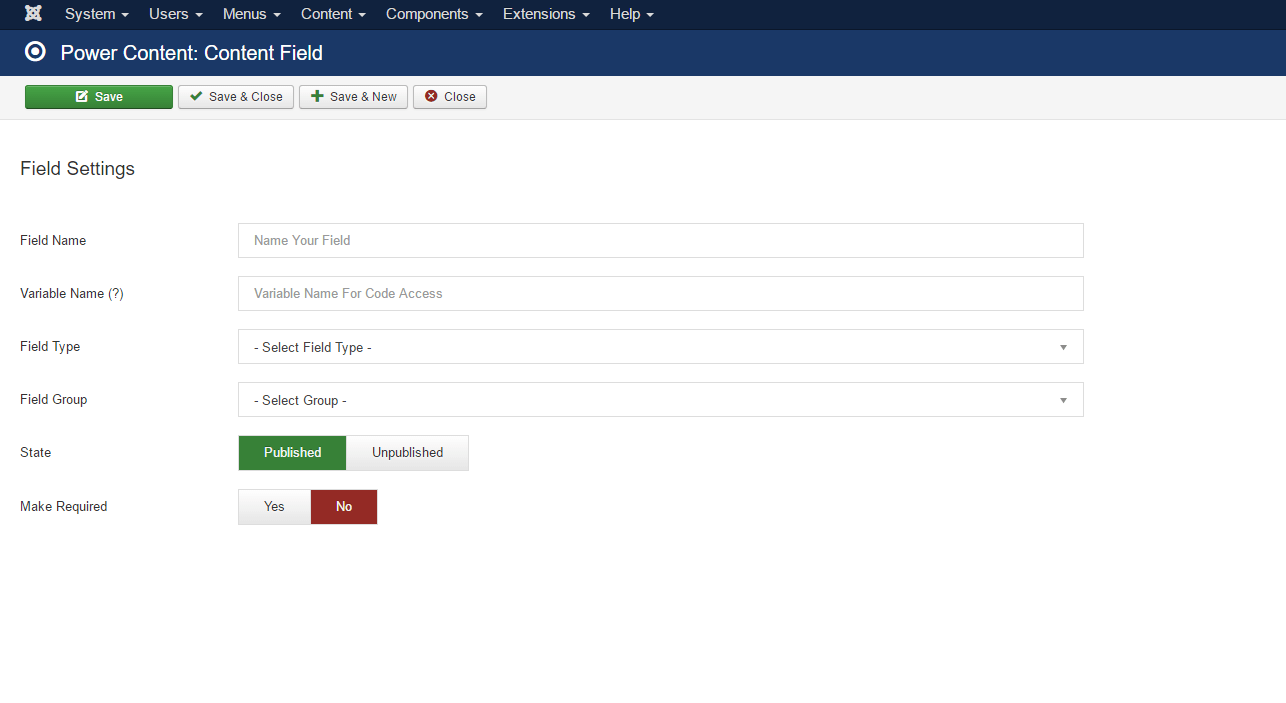
On this page, we’re creating a new content field. Let’s explain those settings you see:
Field Name – This is the name of the field that will appear in the group, in the record. It doesn’t have much functionality and is used mostly for identification, so give it a clear name.
In our example, let’s call it: “Sample Editor Field”
Variable Name – This is important; what you put here will define the way we access the field from the code. You can put anything you want here, just notice that Power Content will strip the text you put here and format any spaces or special characters to an underscore, as well as lowercase.
In our example, let’s insert: “sample_editor_field”
Field Type – Here,we will select the type of the field, if that’s a media (image) field, a text-editor field, select list field, and more. A full list of available fields can be found in the last section of this documentation.
In our example, let’s choose: “Editor” field type (which is a text editor)
Field Group – This is where we assign the field to its appropriate group. Clicking this will show you a drop down of all available Content Fields Groups from your website. Just select one.
In our example, let’s choose our: “Sample Fields Group”
State – Published/Unpublished. If it’s unpublished, you won’t see it or be able to access it anywhere.
Make Required – A Yes / no option. If you set this to “Yes”, this field will become required and you and your clients won’t be able to save it (in the record) unless it’s filled with content.
Note: After selecting the type of field, you will see a new field popping up at the bottom of the page, allowing you to set a default value. That means that, unless you or your client change this from the record itself, this is the value that the field will have.
Let’s save this field. OK, now we have a group of fields, populated with one field. Let’s create one more additional field. This time, call it “Sample Image Field” and put “sample_image_field” as the variable; select “Media (Image)” as the field type; choose our sample group as this field’s group; and hit Save & Close.
Important: Because we’ve created the editor field first, the order of the fields in the record itself will be first the editor field, and second the image field. We can re-order all the fields (and all the groups also) by simply clicking the two arrows icon to the top and left of the table showing all the fields and all the groups, and then, simply drag and re-order however you like. Note the following image:
We should now have the following:
One Fields Group named “Sample Fields Group”
- Two Content Fields, with the first named “Sample Editor Field” of type “Editor” and a second named “Sample Image Field” of type “Media (Image)”
- Both fields are assigned to the group “Sample Fields Group”
Now, we will assign our group to some records, and start to actually use it.
Assigning the group to our records
Let’s navigate back to the group we created earlier: “Sample Fields Group”. If you remember, when I walked you through creating the group, I asked you to ignore the “Group Assignments” settings. Now, I’ll explain it in detail.
This group of settings makes working with Content Fields extremely powerful and D.R.Y (don’t repeat yourself—a principle of good programming, which is good for you to know even if you’re not a developer).
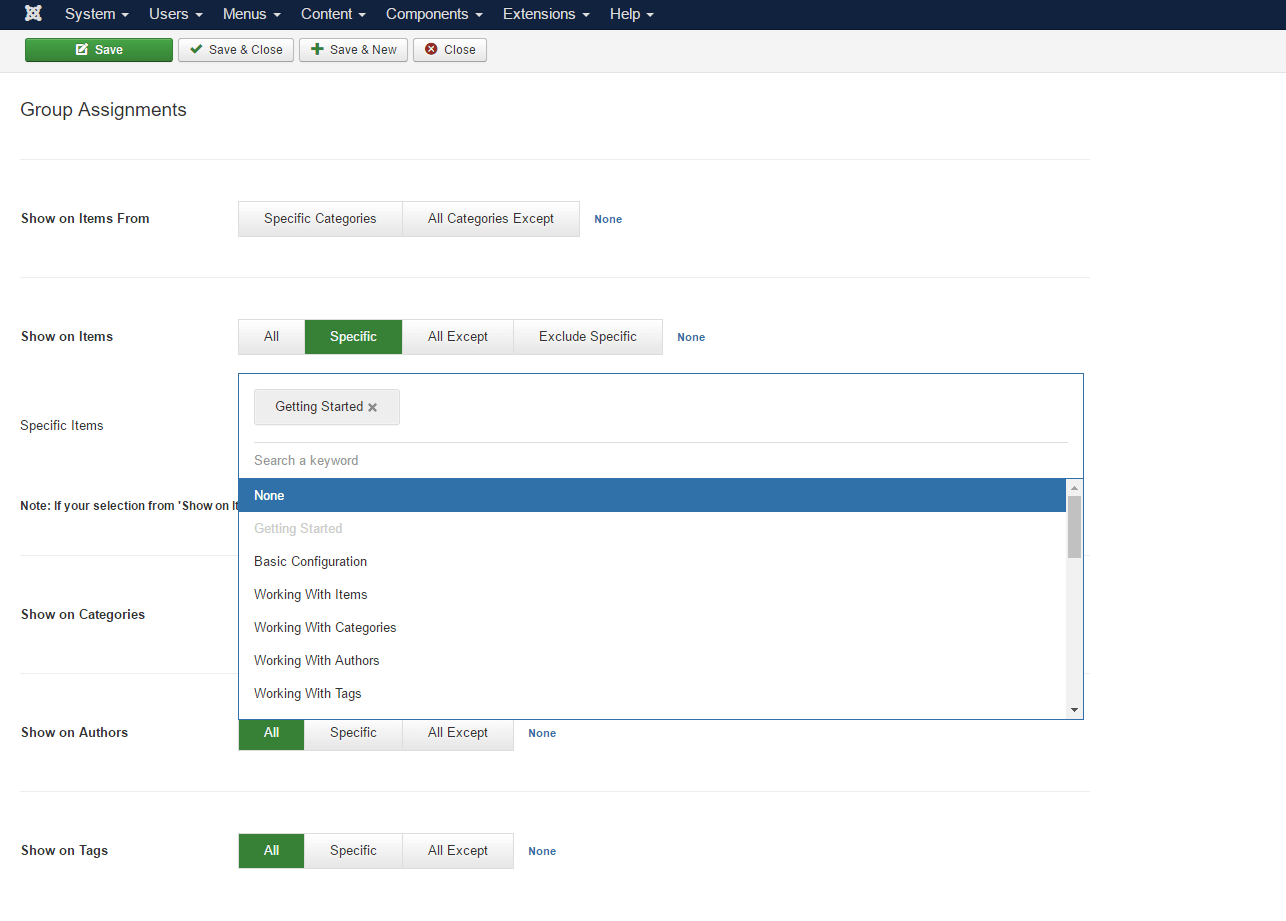
You will see that in any of the assignments options, you will have the following options: All, Specific, and All Except. In the “Show on Items From” and “Show on Items”, you will have some additional settings, which I’ll explain later. Note that you can make unlimited combinations. You can have one group assigned to all types of records, on records of type “author” only, “categories” only, all tags except some, and just two authors and one item, or some other combination.
All – When we select “All”, whether for items, categories, authors, or tags, this group will be available for all the records. So, for example, if we put it to “All” in the “Show on Authors”, this group of fields will be shown on all the records of type “Author”.
Specific – Clicking on this option will open a drop down selection of all the available records of the specific type you have clicked on. So, if you have clicked the “Specific” in the section named “Show on Tags”, you will see a drop down of all of your website’s tags. This field is a multi-select field so you can choose as many specific records as you want, and this group will appear ONLY for those specific records.
All Except – This field does exactly what the “Specific” does, except that what you choose here will be excluded. Meaning, this group of fields will be shown on all records EXCEPT for what you have selected here. For example, we may want this group to appear on all of our website’s categories except for “General Pages” (let’s assume we have such a category). So we will go to “Show on Categories” and select “All Except” in the dropdown, and we will choose “General Pages”. Now this field is available on all of our website’s category views, except for “General Pages”.
Important – all of those options will work automatically so when you create new records, you don’t need to do anything, it will automatically be assigned to them, unless you have chosen specific records of course. So no need to worry, you only handle with the settings once.
When it comes to assignments for items, there are several additional and interesting filtering options that make our lives easier.
We can assign fields groups to items just like we do for authors, tags, and categories, and we can assign fields groups to items by the item’s category using the “Show on Items From” section, which has “Specific Categories” and “All Categories Except” options.
This allows us, for example, to have a specific group of fields that will appear on all the items of our blog, and any new item we create will automatically have those fields without any new configuration needing to be set. The fields are also being loaded with AJAX each time you select a category for your item, so it will simply load the fields even if the item is not saved yet. This makes managing and working with the fields extremely easy.
Note that for some items, we can even select some specific categories - “Blog”, for instance—but still exclude some specific blog items from these assignments using the “Exclude Specific” option of the “Show on Items” section.
In addition, note that those assignments allow you to make “overlapping” settings. For example, we can choose to display on our group all items except those from the “Blog” category, but still choose some specific blog items using the “Show on Items”, This overlap is solved with the “Show on Items” stronger than the “Show on Items From”. So if there’s an overlap, the “Show on Items” settings will be set.
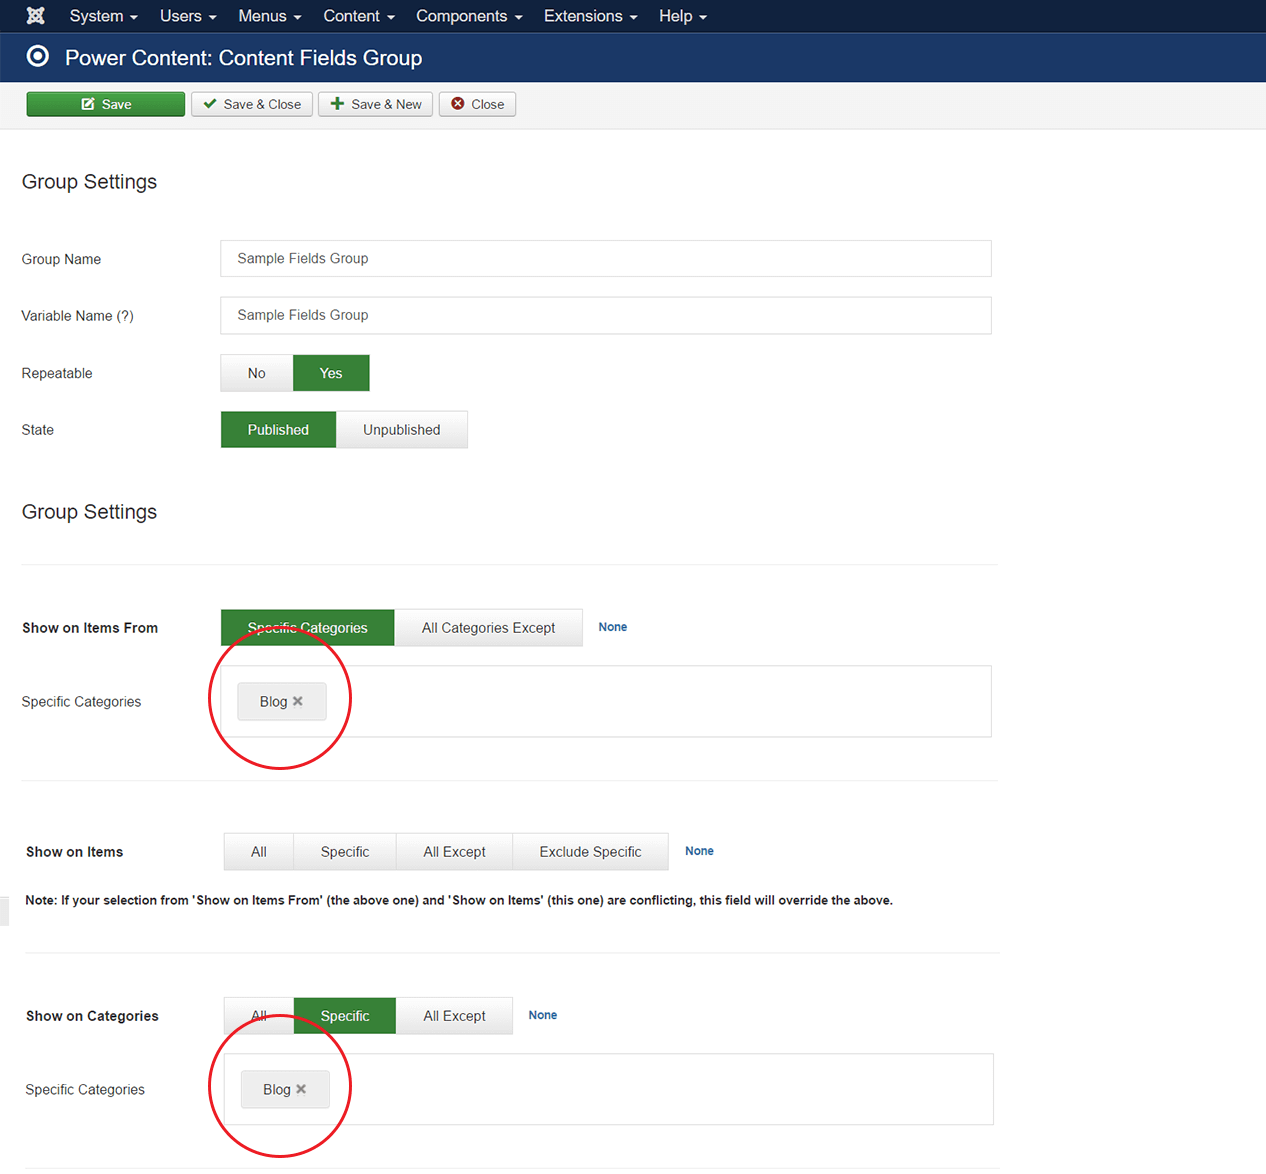
As for our step-by-step guide, let’s assign our “Sample Fields Group” with two assignments:
- In the “Show on Items From”, let’s select “Specific Categories” and choose “Blog”. If you don’t have a blog category, choose something else. Or, for the sake of this tutorial, create a blog category. Learn about Power Content categories.
- In the “Show on Categories”, let’s choose “Specific” and select the “Blog” category.
What we did here is make this Fields Group available both on the Blog category view AND on all of our items that are assigned to the Blog category. Your group settings should look like the following picture:
Now let’s click Save & Close and let’s start populating those fields with content.
Filling the fields with content from the record pages
As I mentioned earlier, those fields are now available both on the Blog category view and on all of its items. Let’s start with the blog category itself. You will now see the following fields in your blog category view:
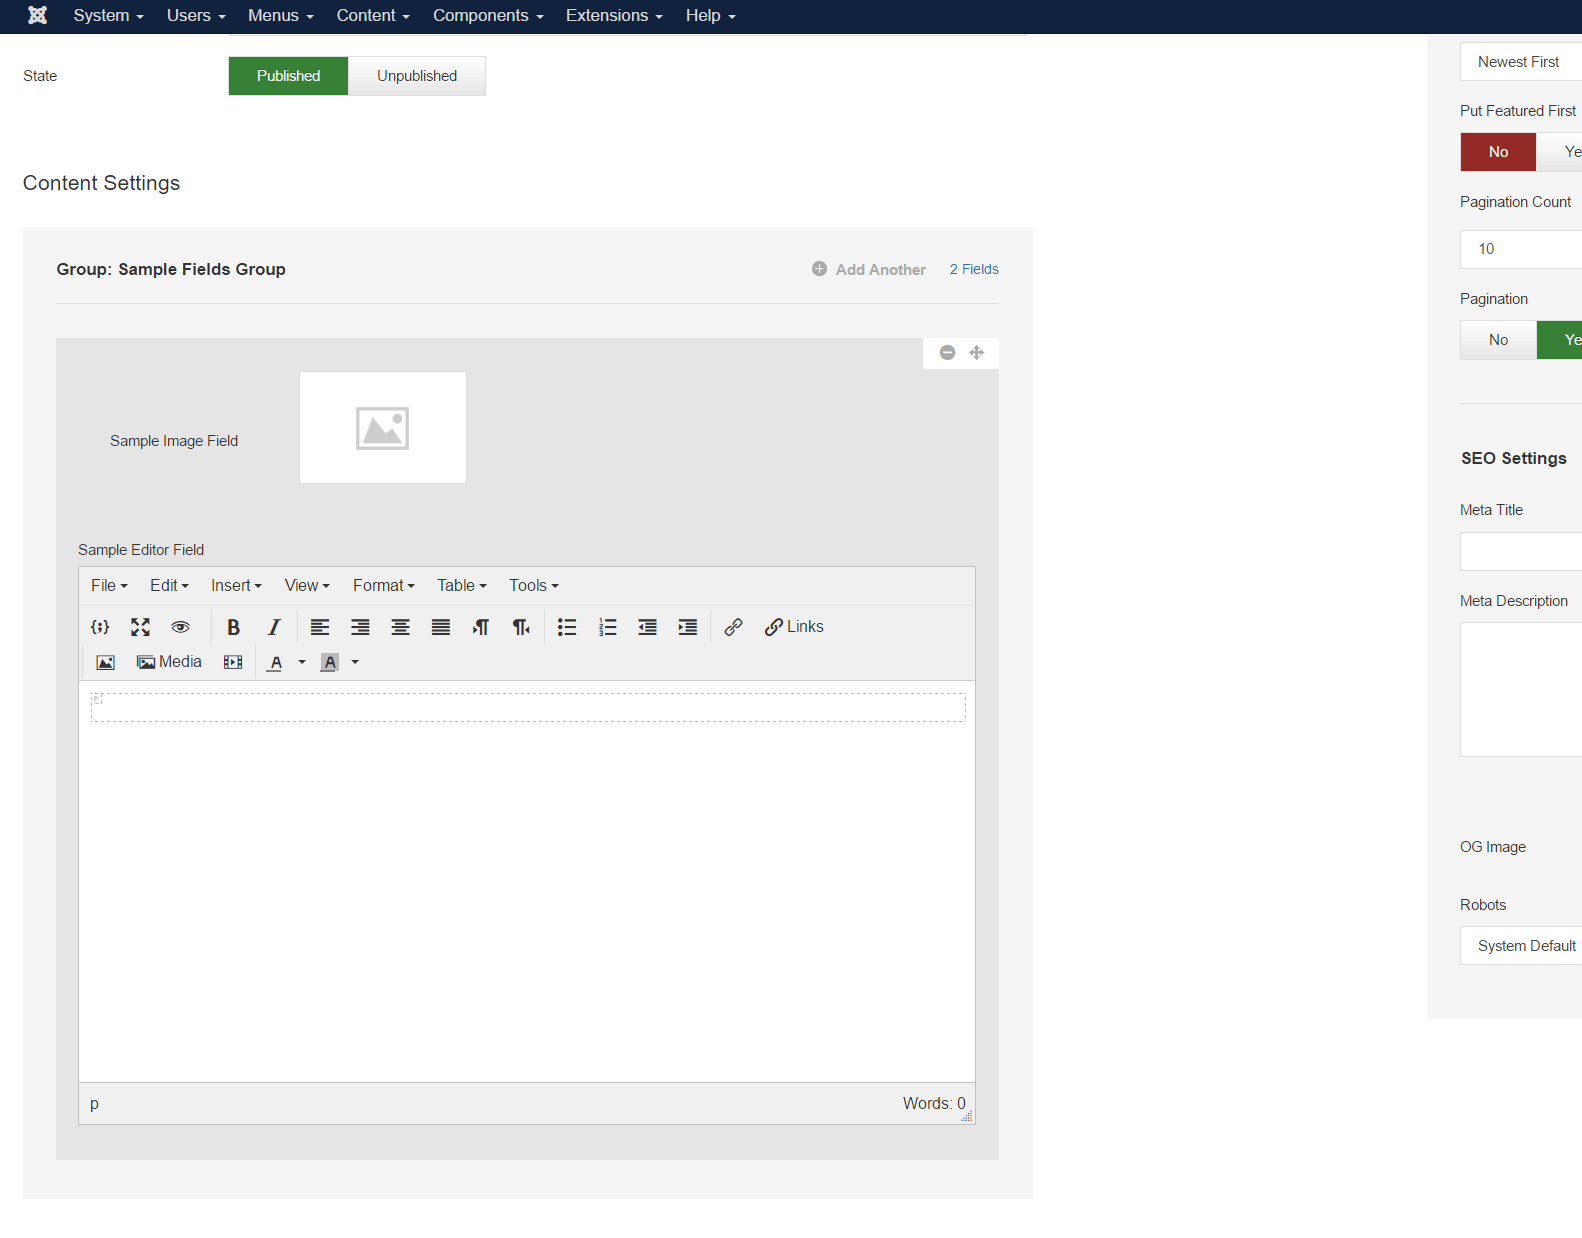
In order to populate this with content, simply write whatever you want in the editor (Learn more about Power Content’s Editor) and click the image icon, to open Power Content’s Media Manager and select some image.
Note: We’ve chosen this group to be “Repeatable”, so take a look at the top of the field where you’ll see a button called “+ Add Another”. Clicking this button will add as many groups to this as you want, right below each other. You should know that creating editor fields on the fly requires a lot of processing and may take a few seconds if you have more then three to four editors on one page; simply click a button and wait two to three seconds until it’s done processing. For other fields (groups without editor fields), it takes less than a second. You can also remove and re-order the fields inside the record using the “Minus” and “Move” buttons to the top right of each group.
If you didn’t choose this group to be repeatable, it won’t have those add/move/remove options and will look a little different. Note the following image:
Other records like items, tags, and authors work exactly in the same way. Just note one thing: You won’t see those fields when you simply create a new item. However, when you select this item’s category as “Blog”, those fields will automatically load with AJAX, so you can keep the workflow with no interruptions.
Displaying the fields on our web pages & code access
Before we begin, note that in this section’s examples, I’ll use just some of the data available; however, you have TONS of additional data that you can actually SEE and ACCESS easily, even if you’re not a developer. Check out the Power Debugger built-in plugin that comes with the component, in order to figure out how to access additional data and functionality.
Accessing fields of a NON repeatable group:
In order to access the Content Fields in our code, we will go like this:
<? php echo $this->category->fields->sample_editor_field->value; ?>

<? php echo $this->category->fields->sample_image_field->value; ?>
For the image example, we need to actually make an image, like this:
<img src=”<?php echo $this->category->fields->sample_image_field->value; ?>”>
What is actually going on here? Each record has an object named fields, which contains all of its available content fields. To access a specific field, we will put the variable name as we defined it in the creation of the field. Note that in the Fields view where you see all your fields in the admin, below the name, you will be able to see a gray line with the proper code to access it. And after the variable name we have the value, which is the value we have populated the field with. You can also access its settings, name, and more, instead of ->value write ->name. You can use it for ALT attribute and other things. Use the Power Debugger Plugin I mentioned above to see all of the data.
Note that this changes from record to record. If we’re accessing the fields on a tag view, then $this->category should change to $this->tag, and same goes for item and author.
If we’re accessing the fields on items, in a category, tag, or author view, it will usually be inside a PHP loop. In that case, we will drop the $this->, and will stay with: $item->fields->field_name->value;
Accessing fields of a repeatable group:
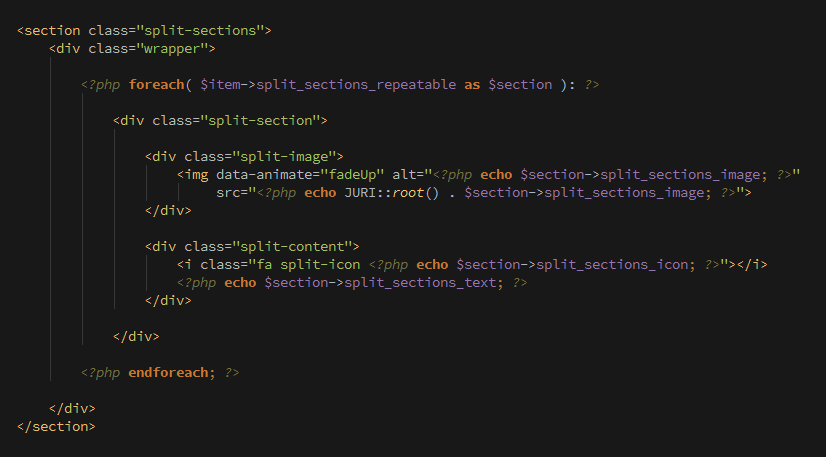
The whole point of the repeatable feature is that it happens inside a loop. That way, you and your clients can add endless new groups and they will automatically show. Each repeatable group is automatically given _repeatable in its name, at the end. For example, our group’s variable is “sample_fields_group”. In the code, it will become “sample_fields_group_repeatable”. To display the value of our repeatable fields, we will go like this:
foreach( $this->category->fields->sample_fields_group_repeatable as $sampeFields ) {
    echo $sampleFields->sample_editor_field;
    echo $sampleFields->sample_image_field;
}
This will bring up all the existing new fields in that repeatable group, with the proper order you have set up in your admin. You can, and should, build HTML inside it. Take a look at the following image, for example:
Types of available Content Fields
Here’s a list of all types of available fields in Power Content:
Text Fields – Standard text input
Text Area – Standard text area (no editor)
Editor – Power Content’s powerful Text Editor field
Media (Image) – Power Content’s Media Manager field
Link – Power Content’s Links Manager fields
Select List – A standard HTML select list
Multi Select List – A select list with multiple options and values
Color – A color picker field
Calendar – A date calendar field
Separator – A field to format the look of the fields
Hidden – A hidden field that has a built-in value
Note – A field to display text in order to explain something in the admin
Custom Head Tag – A field that will be shown in the < head > of the documents. Learn about this field and its functionality in the “SEO Management” part of the documentation (usually, this field is used to set canonical tags and marketing campaigns codes).
I’ve tried to include as many types of fields as I could think of, so if you have a need for additional types, let me know. In addition, you can add as many new fields as you like by developing a Power Content plugin.